I don’t think I’ve ever been accused of being loose with my spending. In fact, I believe my wife has the opposite complaint. As I understand, this is a common trait of the engineering type, whether it be from the inherent desire to cost optimize my life, or from the overzealous and overconfident way I say to myself, “Oh yeah, I can do that.” Which leads us to the topic of today’s post. What is the easiest way to aquire an expensive item? Buy a broken one cheap and fix it of course!
Today’s subject is a Nikon DSLR 55-200mm 1:4-5.6 AF-S VR camera lens. Prices vary only (as I believe the VR (vibration reduction) is now on VRII in the latest lenses), but around $100-140 USD. The main reason I wanted this, was that I had just picked up a Nikon D3200 setup and that package only came with the non-VR lenses. The supposed advantage to VR is reducing blur on shaky freehand shots, particularly useful on the 200mm zoom as your movements are amplified. This in turn allows for faster shutter, etc. The VR itself works by using accelerometers inside the lens, and compensating for movement by adjusting one of the internal lense elements. I picked one up on EBay for about $30, listed as ‘for parts.’
The listed issue was a stuck aperture. This is easy to test on the unit. Despite all the fancy electronics jammed into the lense for auto-focus, zoom position, and vibration reduction, the aperture is controlled by a mechanical lever that sticks out the back and interfaces with the camera. The lever doesn’t want to move, and the aperture is fully closed. No use waiting, time to open it up and look for the problem.
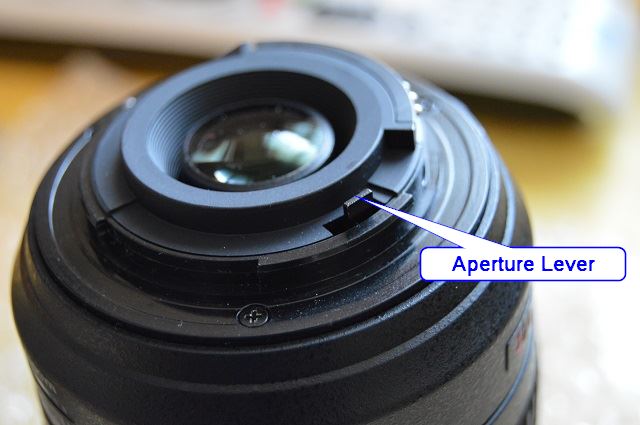
Nikon Lense Aperture Lever

Aperture
First step is to grab a thick piece of paper, like an index card, and a pen. I acutally picked this tip up in the comments section of a Hackaday article on IPhone repair. As you remove the tiny screws from the item, draw a diagram on the paper and punch the screws into it at the corresponding location. Much more effective than the ‘take a picture’ method (for screws anyways), and thick paper does a good job at holding them too, so they don’t roll off of your work bench.

Screw Card
While the most prominent screws are the three on the back side facing up, I’m going to remove the ones around the perimiter of the mounting ring. This frees the inner plastic pieces, and importantly, the connector piece. This prevents you from pulling this up with the rest of the mount ring and damaging the flat flex cable. However, when removing the mount ring from the back, there is a separate ground pin, connected by a screw on the back side and a single wire that can be damaged if you are not careful.
After all the screws around the inner perimeter of the mount ring are removed (5 in total), and the three larger screws on the face of the mount ring are removed we are ready to get inside. Be cautious when handling the lens at this point, as there is nothing holding the rear housing onto the rest of the lens anymore. An attempt to pickup the lens by the rear housing (where the model number is stamped) could be very surprising and disastrous. First thing you want to remove is the piece that sits inside the mount ring. This will free up the connector peice so you can move it out of the way and get the mount ring off.

Nikon Aperture Ring Disassembly
Now, the aperture lever has an external arm that interfaces with the camera and an internal one that does the work. These two are in different spots, connected to a spring loaded ring that rotates along the inside of the mount ring. Remembering that ground wire I mentioned, the internal part of the aperture lever is far too long to be able to simply lift the whole assembly off the lense without damaging the wire. You can separate the metal aperture ring from the plastic mount ring by rotating it to a position that allows it to be freed. However, with the aperture stuck, well have to move the mount ring instead. First, to make it easy on yourself, remove the spring. I used a small flat screwdriver to guide the one side off the plastic anchor attached to the mount ring. You should only be able to move the ring one direction, the way that would have tensioned the spring. Once it gets past its normal range of motion, it should simply fall off.

Nikon Aperture Ring Disassembly 2
For further repairs, or if you are doing this to replace the mount ring itself, you should detach that ground pin. I’m leaving it hanging off to the side with a little support underneath to avoid putting pressure on the wire. Replacing the mount ring only is actually a common repair, and you can find a lot of lenses on EBay with broken mounts. Commonly the camera is dropped and the plastic on the lens gives way to the metal mount on the camera. Replacement mount rings can also be purchased on EBay in the 1 to 2 dollar range with free shipping from China.
At this point you’ll notice several pieces of metal, which I believe are simply shims. Note the position and remove them if they are in the way. Now, carefully maneuver the connector piece out of the way and slid the aperture lever assembly up and out. This is were I noticed the potential problem in my lens. The inner lever has a slot in it, and there appears to be a lever with a pin inside the lens. As I was able to pull the part right out of the lens, it seemed obvious that these two parts should be mating, but were not. A quick probe with the screwdriver proved that that the lever with the silver pin operated the aperture. So now it is time to mate these parts up and reverse the disassembly process. The only thing I’m worried about now is that someone had trying to repair this lense already and reassembled it wrong, and I was going to discover another, more sinister problem.

Aperture Lever Pin
Using the precision flat screwdriver again, I pushed the pin gently to the interior of the lens to make room to slide the aperture arm in such that the pin would enter the slot. Re-aling the shims, and flip the mount ring back into position. The problem I ran into here was that it was quite tricky to get the metal ring back into its channel on the mount ring in this position. The connector piece seems to find itself in the way, and the bits you need to align are on the blind side. I ended up moving the metal ring temporarily above the connector so they wouldn’t interfere with each other, and used a long nose pliers to pull the ring up into the mount. The entrance to the channel is in the position where the aperture is fully open (counter-clockwise), so you also have some new spring resistance from inside the lense while doing this. Once it’s in the channel, let it rotate all the way to rest (clockwise). Now you can put the other end of the spring back on its anchor. I do this by putting the small flat screwdriver inside the loop and letting it slide of the end onto the anchor.
Here you can put the three mount ring screws back on, provided the shim holes are still aligned. Now you should be able to give the lever a little test. I had to remove the ring and re-adjust the flat flex cable as it was somehow interfering with the ring travel. Now replace the one other piece you removed and insert all the screws as shown in your diagram.
On first test, everything worked! My only concern is the sound the autofocus was making, not loud, but much more audible than the ‘silent focus’ is supposed to be. But hey, what do you want for $30?
Thanks for reading, good luck, and happy repairs!
Pingback: Nikon Resurrection: Repairing a Broken Lens | Hackaday