Build #3
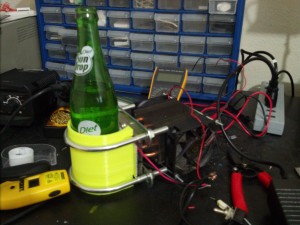
In my continuing effort to build a working cooled cup holder, I’ve put together another unit. In this attempt, instead of using a plate and having the container cooled from the bottom I decided to attach it to the side, and have a small enclosure to attempt to insulate the beverage a little bit to help increase the cooling effect. Also, from my experimentation in part 1, I found that the cooling elements produce tons of heat, and so would need a quite large heat sink to keep things cool. Since these devices work by producing a certain temperature delta from one side to the other, keeping the hot side as cool as possible is key, and apparently very difficult. Cooling from the side allows for a large sink without holding the beverage up in the air. As you can see in the above picture, this build features a large Dell workstation CPU heat sink I scored off EBay for about $15. These are nice and feature a copper base fused with copper tubes that carry the heat into the aluminum fins. A salvaged fan forces some air through the fins.
The main design of this build features a printed cylindrical body with an opening on one side. Aluminum sheeting is cut and fit on the inside of the container to help transfer the cooling to all sides, and a piece of aluminum flat stock is used as the main contact with the cooling element and covers the opening. The cooling element used is a 12 volt, 16 amp version. Two large U brackets hold the assembly together and press the heat sink tight to the hot side of element. I’m using the same 10 amp, 12 volt power supply brick as the previous experiment.
Test Results
In this experiment I’ve powered on the element and placed a glass container of Diet Sun Drop, measured at about 38F to start, and let the unit run for approximately 30 minutes. The plate measured about 33 F inside the container while running, and the heat sink fins stabilized at around 100F. That’d a good step forward, as previous experiments seemed to just keep getting hotter. However, it did not manage to keep the soda cold. After the 30 minutes, with the ambient temperature around 70F, the soda measured about 45F, not a huge increase, but nowhere near our cooling goal.
Conclusions and Analysis
Reflecting on the experiment, I’ve already noticed several problems. One, I didn’t use a control. That is, I should have left another soda on the bench next to the experiment and measured its after temperature as well. This would give a measure of how much effect, if any, that the cooler had on the soda. Secondly, I was overloading my power supply. It measured about 145F after the experiment. What I didn’t measure was the voltage output of the supply to ensure the load wasn’t causing the output to sag.
In the next round, I will try a few improvements. My fan, while very quiet, could be a little faster to keep the heat sink temperature down, which should decrease the cold side temperature. I will use a higher current power supply to ensure the element is operating at full power and the supply can operate in a safe manner. I may try higher power cooling elements as well, and possibly experiment with stacking the elements to achieve colder temperatures.
This project is turning out to be more challenging than originally planned. However the prospect of keeping my soda cold with a high power home built contraption is enough to keep on trying. More to come…..

Pingback: Fail of the Week: Project Frosty Mug is Merely Chilly | Hackaday